Mastering the Art of Removing RTV Silicone: A Comprehensive Guide
Removing RTV (Room Temperature Vulcanizing) silicone can be a frustrating task, whether you’re dealing with a botched DIY project, performing maintenance on your car, or renovating your home. RTV silicone, known for its strong adhesion and flexibility, is a popular sealant and adhesive. However, its durability can make its removal a challenge. This comprehensive guide provides effective methods and techniques for safely and efficiently removing RTV silicone from various surfaces. Understanding the properties of RTV silicone and selecting the appropriate removal method are crucial for achieving successful results without damaging the underlying material.
Understanding RTV Silicone
RTV silicone is a type of silicone elastomer that cures at room temperature. It’s widely used in construction, automotive, and manufacturing industries due to its excellent resistance to temperature extremes, chemicals, and moisture. Its flexibility and strong adhesive properties make it ideal for sealing gaps, bonding materials, and protecting surfaces. However, these same properties can make removing RTV silicone a difficult process.
Types of RTV Silicone
- Acetoxy Silicone: Releases acetic acid (vinegar smell) during curing. Generally stronger and more resistant to chemicals.
- Neutral Cure Silicone: Releases alcohol or other non-acidic byproducts during curing. Less corrosive and suitable for sensitive materials.
Knowing the type of RTV silicone you’re dealing with can help you choose the most effective removal method. Acetoxy silicone is typically more resistant and may require stronger solvents or more aggressive techniques.
Preparing for RTV Silicone Removal
Before you begin removing RTV silicone, it’s essential to gather the necessary tools and take safety precautions. Proper preparation will make the process smoother and minimize the risk of damage or injury.
Essential Tools and Materials
- Plastic Scrapers: For gently lifting and scraping away the silicone without scratching the surface.
- Razor Blades or Utility Knives: For carefully cutting through thicker layers of silicone. Use with extreme caution.
- Solvents: Mineral spirits, isopropyl alcohol, or specialized silicone removers can help break down the adhesive bond.
- Heat Gun or Hair Dryer: Applying heat can soften the silicone, making it easier to remove.
- Clean Cloths or Rags: For wiping away residue and solvents.
- Safety Glasses: To protect your eyes from debris and chemical splashes.
- Gloves: To protect your hands from solvents and potential irritants.
- Ventilation: Ensure adequate ventilation, especially when using solvents.
Safety Precautions
Always prioritize safety when removing RTV silicone. Wear safety glasses and gloves to protect yourself from potential hazards. Work in a well-ventilated area, especially when using solvents, to avoid inhaling harmful fumes. Be cautious when using razor blades or utility knives to prevent cuts. If you’re unsure about the safety of a particular method or solvent, consult a professional.
Effective Methods for Removing RTV Silicone
Several methods can be used for removing RTV silicone, depending on the surface it’s adhered to and the thickness of the silicone layer. Here are some of the most effective techniques:
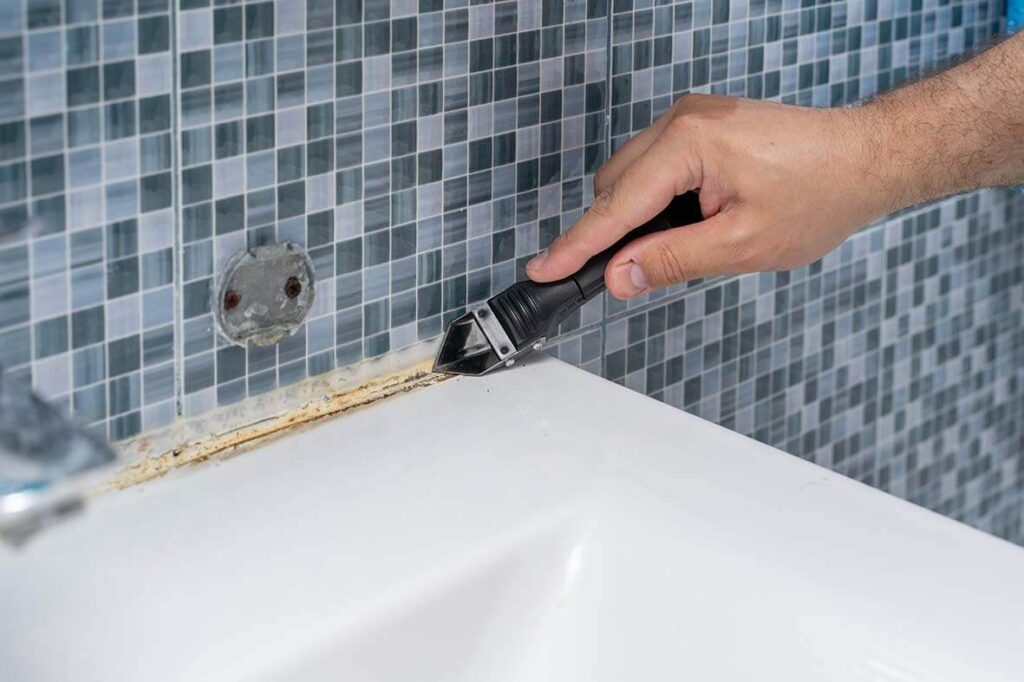
Mechanical Removal
Mechanical removal involves physically scraping or cutting away the silicone. This method is best suited for thicker layers of silicone or surfaces that are resistant to scratching.
- Cutting: Use a razor blade or utility knife to carefully score along the edges of the silicone bead. Be careful not to cut into the underlying surface.
- Scraping: Use a plastic scraper to gently lift and scrape away the silicone. Work slowly and apply steady pressure to avoid scratching the surface.
- Prying: For larger pieces of silicone, you may be able to pry them off using a flat-head screwdriver or similar tool. Be careful not to damage the surface.
Solvent-Based Removal
Solvents can help break down the adhesive bond of the silicone, making it easier to remove. This method is best suited for thinner layers of silicone or surfaces that are sensitive to scratching.
- Apply Solvent: Apply a small amount of solvent (mineral spirits, isopropyl alcohol, or a specialized silicone remover) to the silicone.
- Soak: Allow the solvent to soak into the silicone for several minutes to soften it.
- Scrape: Use a plastic scraper to gently scrape away the softened silicone.
- Repeat: Repeat the process as needed until all the silicone is removed.
- Clean: Clean the surface with a clean cloth and a mild detergent to remove any remaining solvent residue.
Specialized silicone removers are often more effective than general-purpose solvents. These products are specifically formulated to break down the chemical structure of silicone, making it easier to removing RTV silicone.
Heat Application
Applying heat can soften the silicone, making it easier to remove. This method is best suited for surfaces that can withstand heat without being damaged.
- Apply Heat: Use a heat gun or hair dryer to apply heat to the silicone for several minutes. Keep the heat gun moving to avoid overheating the surface.
- Scrape: Use a plastic scraper to gently scrape away the softened silicone.
- Repeat: Repeat the process as needed until all the silicone is removed.
Be careful not to overheat the surface, as this can damage or discolor it. Test the heat on an inconspicuous area first to ensure it’s safe.
Using Household Items
Believe it or not, some common household items can be surprisingly effective at removing RTV silicone. These options are often less harsh than chemical solvents, making them a good choice for delicate surfaces.
- Vinegar: White vinegar’s acidity can help break down the silicone. Soak a cloth in vinegar and apply it to the silicone for several hours, then try scraping it off.
- Baking Soda Paste: Make a paste of baking soda and water. Apply it to the silicone, let it sit for a while, and then scrub with a non-abrasive sponge.
- WD-40: While not a solvent specifically designed for silicone, WD-40 can sometimes help loosen the bond. Spray it on the silicone, let it sit, and then try scraping.
Removing RTV Silicone from Different Surfaces
The best method for removing RTV silicone will vary depending on the type of surface you’re working with. Here are some tips for removing silicone from common surfaces:
Glass and Ceramic
Glass and ceramic surfaces are relatively resistant to scratching, so you can use a razor blade or utility knife to carefully cut through the silicone. Be sure to hold the blade at a shallow angle to avoid scratching the surface. Follow up with a solvent to remove any remaining residue.
Metal
Metal surfaces can be scratched, so it’s best to use a plastic scraper and a solvent to remove the silicone. Heat can also be used, but be careful not to overheat the metal.
Plastic
Plastic surfaces are easily scratched, so it’s essential to use a plastic scraper and a mild solvent. Avoid using heat, as this can melt or warp the plastic.
Painted Surfaces
Painted surfaces are the most delicate and require the gentlest approach. Use a plastic scraper and a very mild solvent, such as isopropyl alcohol. Avoid using heat or harsh chemicals, as these can damage the paint.
Cleaning Up After RTV Silicone Removal
Once you’ve removed the bulk of the silicone, it’s essential to clean up any remaining residue. This will ensure a clean and smooth surface for any subsequent repairs or finishes.
Removing Residue
Use a clean cloth and a mild detergent to wipe away any remaining solvent residue. You can also use a specialized silicone remover to dissolve any stubborn residue. For porous surfaces, you may need to use a stiff brush to scrub away the residue.
Final Touches
Once the surface is clean and dry, inspect it for any remaining imperfections. You may need to sand or polish the surface to achieve a smooth finish. If you’re planning to apply new sealant or adhesive, be sure to clean the surface thoroughly to ensure proper adhesion. [See also: Best Sealants for Bathroom Tiles]
Preventing Future RTV Silicone Problems
While removing RTV silicone can be a necessary task, it’s even better to prevent the need for removal in the first place. Proper application and maintenance can significantly extend the lifespan of silicone sealants and adhesives.
Proper Application Techniques
- Clean the Surface: Ensure the surface is clean, dry, and free of any contaminants before applying silicone.
- Use the Right Tool: Use a caulking gun with a nozzle that’s sized appropriately for the gap you’re filling.
- Apply Evenly: Apply the silicone in a smooth, even bead.
- Tool the Joint: Use a wet finger or a caulking tool to smooth the silicone and create a professional-looking finish.
Regular Maintenance
Inspect silicone sealants regularly for any signs of damage, such as cracks, tears, or discoloration. Replace damaged sealant promptly to prevent water damage or other problems. [See also: How to Inspect Window Seals]
Conclusion
Removing RTV silicone doesn’t have to be a daunting task. By understanding the properties of silicone, selecting the appropriate removal method, and taking necessary safety precautions, you can successfully remove silicone from various surfaces without causing damage. Whether you’re using mechanical methods, solvents, heat, or household items, the key is to work carefully and patiently. With the right tools and techniques, you can restore surfaces to their original condition and prevent future silicone-related problems. Remember to always prioritize safety and consult a professional if you’re unsure about any aspect of the removal process.
