The Ultimate Guide to Removing Vinyl Stickers from Your Car: A Step-by-Step Approach
Vinyl stickers are a popular way to personalize your vehicle, whether it’s showcasing your favorite sports team, promoting your business, or simply adding a touch of personal flair. However, the time may come when you want to remove these stickers. Perhaps you’re selling your car, rebranding your business, or simply tired of the design. Removing vinyl stickers from your car can seem daunting, but with the right tools and techniques, it’s a manageable task. This comprehensive guide will walk you through a step-by-step approach to safely and effectively remove vinyl stickers without damaging your car’s paint.
Understanding the Challenge of Removing Vinyl Stickers
Before diving into the removal process, it’s crucial to understand why removing vinyl stickers from your car can be tricky. Vinyl stickers are designed to adhere strongly to surfaces, which means they can leave behind residue, tear into small pieces, or even damage the underlying paint if not removed carefully. Factors like the age of the sticker, the type of adhesive used, and the exposure to sunlight and weather conditions all play a role in how difficult the removal process will be.
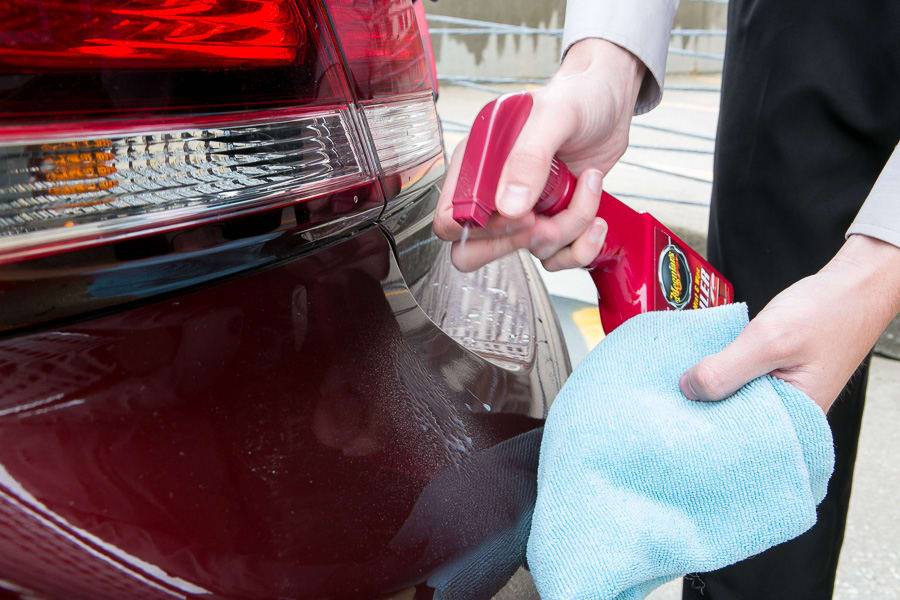
Essential Tools for Removing Vinyl Stickers
Having the right tools on hand is essential for a successful sticker removal. Here’s a list of items you’ll likely need:
- Heat Gun or Hair Dryer: Heat softens the adhesive, making it easier to peel away the sticker.
- Plastic Razor Blade or Scraper: These tools help lift the edges of the sticker without scratching the paint. Avoid using metal scrapers, as they can easily damage the finish.
- Adhesive Remover: Products like Goo Gone, WD-40, or specialized automotive adhesive removers help dissolve stubborn residue.
- Microfiber Cloths: Use these for applying adhesive remover and wiping away residue.
- Spray Bottle with Soapy Water: Helps lubricate the surface and loosen the sticker.
- Gloves: Protect your hands from adhesive remover and heat.
- Isopropyl Alcohol: For final cleaning and degreasing.
Step-by-Step Guide to Removing Vinyl Stickers
Step 1: Preparation and Assessment
Start by washing the area around the sticker with soap and water to remove any dirt or debris. This will prevent scratches during the removal process. Assess the condition of the sticker and the surrounding paint. If the sticker is old and brittle, it may require more patience and heat.
Step 2: Applying Heat
Using a heat gun or hair dryer, apply heat evenly across the surface of the sticker. Keep the heat gun moving to avoid overheating any one spot, which could damage the paint. The goal is to soften the adhesive, not to melt the sticker. Hold the heat source a few inches away from the surface and use a sweeping motion.
Step 3: Peeling Away the Sticker
Once the sticker is heated, use a plastic razor blade or scraper to gently lift an edge of the sticker. Work slowly and carefully, peeling the sticker away at a shallow angle. If the sticker resists, apply more heat. Avoid pulling the sticker straight up, as this can tear it and leave behind more residue. Focus on slowly peeling the vinyl stickers from car surfaces, section by section.
Step 4: Removing Adhesive Residue
After removing vinyl stickers from car surfaces, you’ll likely be left with some adhesive residue. This is where adhesive remover comes in handy. Spray the adhesive remover onto a microfiber cloth and gently rub it onto the residue. Let it sit for a few minutes to dissolve the adhesive, then wipe it away with a clean cloth. Repeat as needed. For stubborn residue, you can also try applying a small amount of WD-40 to a cloth and gently rubbing it onto the area.
Step 5: Final Cleaning
Once you’ve removed all the adhesive residue, clean the area with isopropyl alcohol to remove any remaining oils or residue from the adhesive remover. This will also help to degrease the surface and prepare it for waxing or polishing. Finally, wash the area with soap and water and dry it with a clean microfiber cloth.
Dealing with Stubborn Stickers
Sometimes, removing vinyl stickers from your car can be more challenging than expected. Here are some tips for dealing with stubborn stickers:
- Patience is Key: Don’t rush the process. Applying too much force can damage the paint.
- Multiple Heat Applications: If the sticker is particularly stubborn, apply heat multiple times, allowing the adhesive to soften gradually.
- Stronger Adhesive Removers: If standard adhesive removers aren’t working, try a specialized automotive adhesive remover. These products are designed to tackle tough residues without damaging the paint.
- Professional Help: If you’re uncomfortable removing the sticker yourself, consider taking your car to a professional detailer or vinyl wrap installer. They have the experience and tools to safely remove even the most stubborn stickers.
Preventing Damage During Removal
The primary concern when removing vinyl stickers from your car is avoiding damage to the paint. Here are some precautions to take:
- Avoid Metal Scrapers: Metal scrapers can easily scratch the paint. Stick to plastic razor blades or scrapers.
- Don’t Overheat: Overheating can damage the paint. Keep the heat gun moving and avoid focusing on one spot for too long.
- Test Adhesive Removers: Before applying adhesive remover to a large area, test it on an inconspicuous spot to ensure it doesn’t damage the paint.
- Use Gentle Pressure: When scraping or peeling the sticker, use gentle pressure to avoid scratching the surface.
Aftercare: Protecting Your Car’s Paint
After successfully removing vinyl stickers from car surfaces, it’s important to protect the area where the sticker was located. This area may have been shielded from the sun and elements, resulting in a slight difference in color or shine compared to the surrounding paint. To even out the appearance, consider the following:
- Waxing: Apply a coat of wax to the area to protect the paint and restore its shine.
- Polishing: If there are any minor scratches or imperfections, polishing can help to smooth them out and improve the appearance of the paint.
- Detailing: A professional detailing service can provide a comprehensive treatment to restore your car’s paint to its original condition.
Alternatives to Removing Vinyl Stickers
In some cases, instead of removing vinyl stickers from your car, you might consider alternative solutions:
- Overlaying: If you simply want to change the design, you can overlay a new sticker on top of the old one. This is a quick and easy solution, but it may not be suitable if the old sticker is damaged or peeling.
- Custom Vinyl Wraps: Consider getting a custom vinyl wrap to cover the entire area. This allows you to create a completely new look for your car without damaging the underlying paint.
The Environmental Impact of Vinyl Sticker Removal
It’s important to consider the environmental impact of removing vinyl stickers from car surfaces. Vinyl is a plastic material that can take hundreds of years to decompose. When removing vinyl stickers from your car, dispose of the used stickers and any cleaning materials responsibly. Look for recycling options for plastic waste and dispose of chemicals according to local regulations. Choosing eco-friendly adhesive removers can also minimize your environmental footprint.
Common Mistakes to Avoid
To ensure a successful sticker removal, avoid these common mistakes:
- Using a Metal Scraper: As mentioned earlier, metal scrapers can easily scratch the paint.
- Applying Too Much Heat: Overheating can damage the paint.
- Pulling the Sticker Straight Up: This can tear the sticker and leave behind more residue.
- Using Harsh Chemicals: Avoid using harsh chemicals that can damage the paint or clear coat.
- Rushing the Process: Patience is key. Rushing can lead to mistakes and potential damage.
Conclusion: Achieving a Sticker-Free Car
Removing vinyl stickers from your car doesn’t have to be a daunting task. By following these steps, using the right tools, and exercising patience, you can safely and effectively remove stickers without damaging your car’s paint. Remember to take your time, be gentle, and prioritize the protection of your vehicle’s finish. Whether you’re refreshing your car’s look or preparing it for sale, a clean, sticker-free surface will always make a positive impression. If you’re unsure about any step, don’t hesitate to seek professional help. With the right approach, you can achieve a flawless, sticker-free car that looks its best.
[See also: Car Detailing Tips for Beginners]
[See also: How to Protect Your Car’s Paint from the Sun]
[See also: The Best Car Cleaning Products for a Showroom Finish]
